Before reading this you might want to check out my previous post on this transmission: Smart 453 6DCT250 DCT Transmission / Clutch Deep Dive
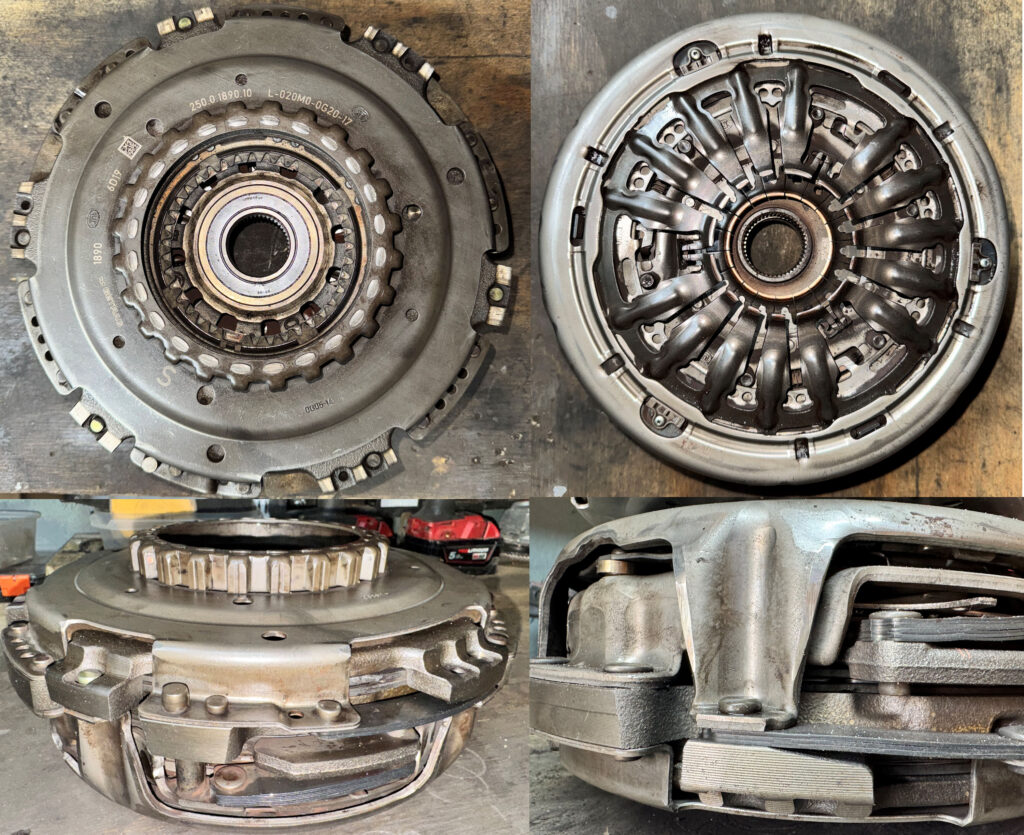
GETRAG 6DCT250 Clutch Pack
The 6DCT250 transmission uses am electronically actuated twin clutch pack with an interference fit to the flywheel.
Before fitting the clutch pack must be in “transport mode” (brand new clutches are shipped this way) with the pressure plate fingers locked into place. If the clutch is not in transport mode it is impossible to fit the circlip that retains the clutch.
Clutch Actuators
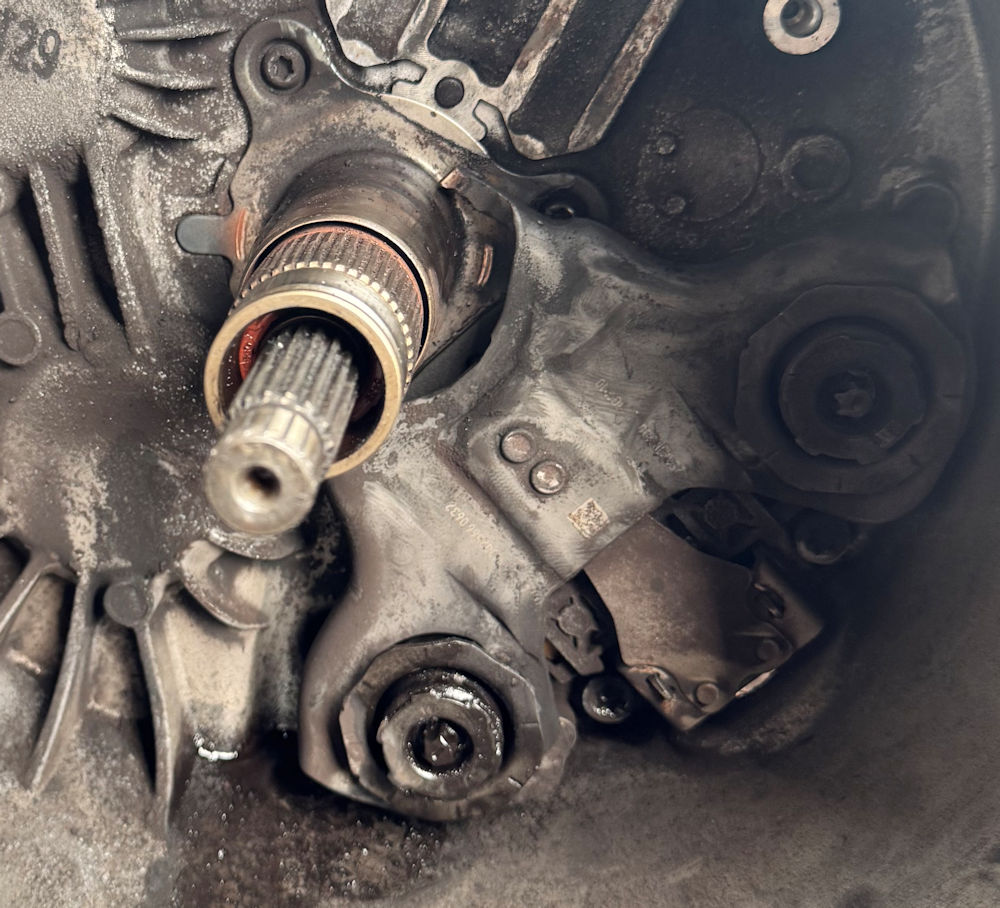
There are two internal actuator fork mechanisms which are actuated by two external motors M14 (for clutch 1) and M15 (for clutch 2).
These actuators are a common failure point, they are in essence a worm drive gear that pushes the fork out and the worm drive can get worn or contaminated with debris – the actuators can be tested using the special splined tool to drive the motor input: you should be able to turn the input anti-clockwise and feel some resistance trying to return the shaft to its original position (much like a clock spring).
Removing the gearbox
At a glance it looks like the gearbox needs to come out with the engine but I can assure you its entirely possible even on a driveway using axel stands. Once the suspension is dropped and the gearbox mount has been removed from the box there is plenty of space.
It’s worth noting this is an EXTREMELY heavy gearbox for its size with the clutch pack alone weighing in at over 15kg so its a two person job.
A few notes:
- Don’t forget to remove the ground harness.
- Unplug the upper connector on the TCU and the crank position sensor (on the same loom) and make sure the loom is detached from the clips on the gearbox and moved out of harms way.
- Remove the very fragile crank position sensor to avoid damaging it.
- When re-installing if you’ve left the (front) torsion engine mount connected to the car make sure you’ve moved it out of the way as it can get trapped between the bell housing and engine.
- Also when re-installing its worth removing the single threaded stud from the gearbox (with a Torx bit) as its much easier to align the box with the stud in the engine block then twist the whole box to line up the dowels (you can refit the stud after).
Installing a new clutch kit
A full clutch kit (LUK 602001900) will come with:
- Clutch pack and inner input shaft drive gear.
- Two clutch actuators.
- Release bearings (and carrier tube).
- New hardware/fixings (bolts and circlips).
To remove the clutch pack the large circlip on the inner input shaft drive gear needs removing and then you can lift it out of the way revealing the circlip that holds the clutch pack to the outer input shaft which also needs to be removed.
Because the clutch is pressed onto the outer input shaft you’ll need to use a suitable puller to withdraw the old clutch pack.
Once the clutch pack is removed you will have access to the release bearings (note their orientation before removing them) and the clutch actuators which are held in with T45 Torx and E10 E-Torx bolts.
NOTE: There are two locating dowels in the gearbox (1 for each actuator fork) make sure the dowel hasn’t got stuck in the old fork.
Refitting is the reversal of the removal process (don’t forget to remove the transport locks on the new actuators) *but* once you have successfully fitted the circlip to the outer input shaft (which is a ROYAL pain in the a***) at that point you need to take the clutch out of transport mode by using the special splined tool to wind both of the actuators anti-clockwise until you cannot turn them anymore and you’ve heard the clutches unlock.
Clutch Adaptions
After installing any new clutch components you should use a suitable diagnostics system (i.e. Mercedes Xentry) to carry out a clutch travel test and perform the clutch touchpoint teach-in.
To perform the touchpoint adaptions park must be selected, the engine coolant temperature must be at least 80c, the foot brake must be pressed and the idle speed must be stable.
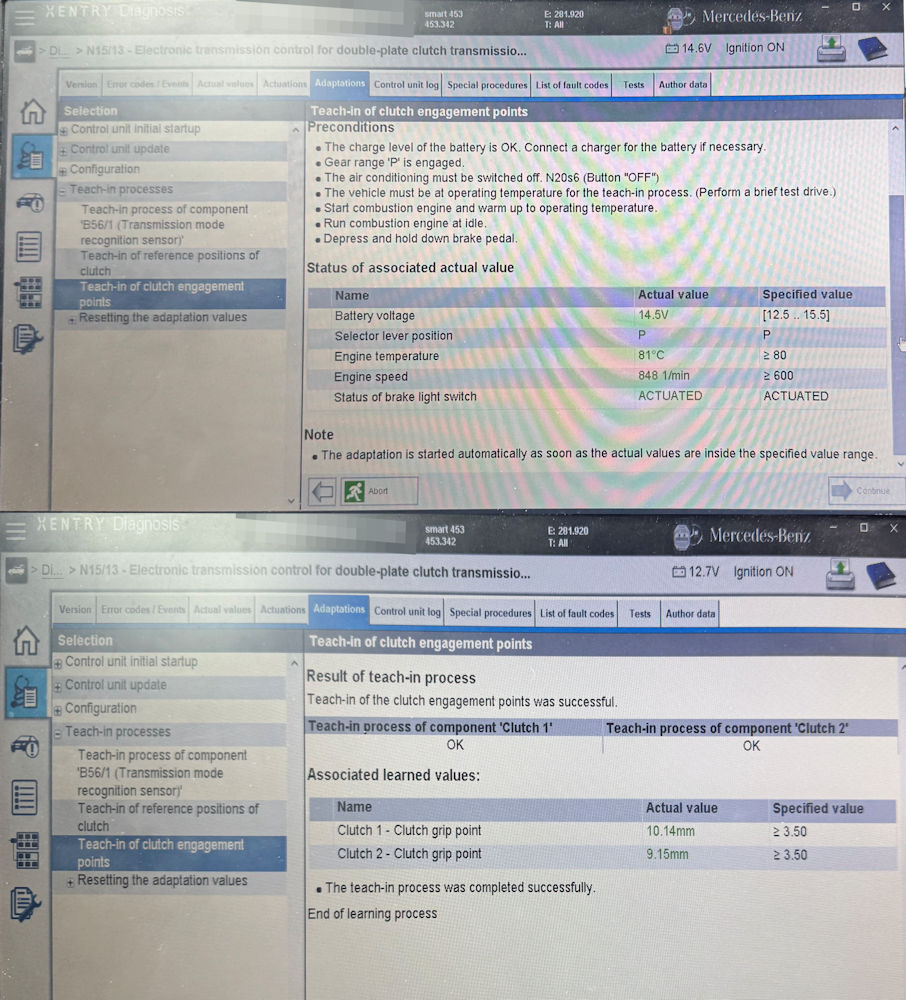
If you have any current engine faults/codes that might cause the revs to fluctuate or be too high other wise the adaption will fail with an “Engine Torque Disturbed” fault:
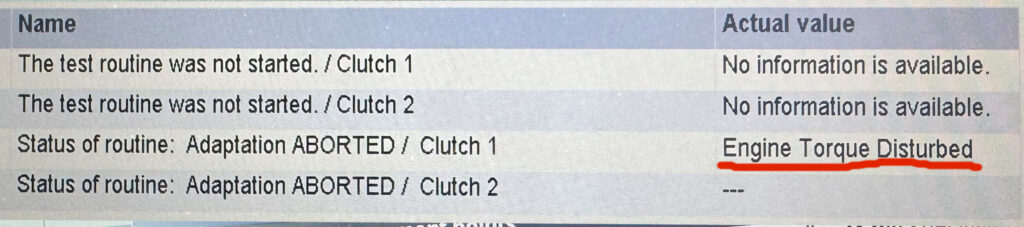
In addition to idle speed issues worn engine mounts can also cause a clutch touchpoint adaption to be aborted due to an “Engine Torque Disturbed” fault, if any of your engine mounts are a bit worn and you’re getting this error try supporting the engine with a jack.
Pingback: Smart 453 6DCT250 DCT Transmission / Clutch Deep Dive – My Blog